
Image Manipulation in Photoshop
Jonathan W. Armbruster
Based on methods from Kyle Luckenbill and Mark Sabaj Perez
Whenever you take a photograph, there are likely to be inconsistencies in the background because of bubbles or crud. There are several possible ways to homogenize the background of pictures of specimens. In general, it is easier to manipulate black or bright blue backgrounds. Background choice often depends on the fish as some show up better on different backgrounds. For this tutorial, I will use one of the photos that we obtained for use in geometric morphometric analysis taken on a piece of glass on a copy stand above a black background. The methods were originally posted by Luckenbill and Sabaj Perez, but I have updated them for the more recent versions of Photoshop, and simplified a couple of steps.
Method 1 – The Rubber Stamp
Small imperfections can sometimes be removed with the rubber stamp tool. With it, you choose a place to take the background from, and then run the rubber stamp over the blemishes. The rubber stamp copies the background from one place to another. Choose the rubber stamp, hit option and click on part of the background and then click where you want to stamp. This sets up the distance and direction from which the rubber stamp is taking the background. This works only with relatively homogenous backgrounds.
Method 2 – The Magic Wand
The Magic Wand selects element of similar color or quality. If the specimen stands out well against the background, you can use the magic wand to select all of the background. If you choose the color you want for the background (use the foreground/background tool), once the background is selected, you can simply hit delete and the background will be homogenized. Unfortunately, it is often impossible to select all of the background or the magic wand chooses part of the specimen. Adjusting the tolerance of the tool can help, but there is a better way of homogenization by using a mask.
Method 3 – The Mask
This method will be detailed in full. What the method does is create a mask the precise size and shape of the background of your specimen, and you simply fill it in with the color you want.
Step 1: Open File. Open the file you want to edit and make sure that it is of appropriate quality (Fig. 1).
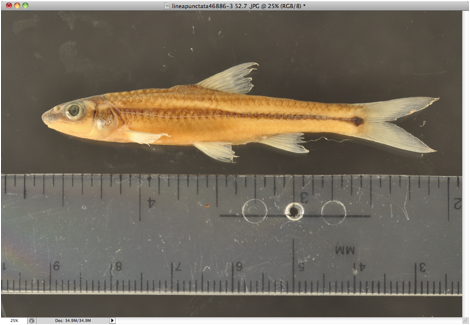
Fig. 1. Original Image
Step 2: Rotate the file. If your file is not level, Choose Select>All and then Edit>Free Transform. If you place the cursor near one of the corners, it will change into an arc with arrows on either end. When you click, the image will rotate. Rotate it until it is level. Then either double click on the specimen or choose another tool and choose “Apply” when prompted.
Step 3: Duplicate layer. Choose Layer>Duplicate Layer. You do this so that if you mess up the duplicate, the original is still there.
Step 4: Scale. If your image has a scale bar, choose the pencil tool, an appropriate color (generally white), and an appropriate pencil size (16 was sufficient for this image), and draw a line on your scale (generally 1 cm; Fig. 2). If you hold the space bar while drawing, your line will be straight. Once done, choose the move tool, and move the scale to someplace near the specimen.
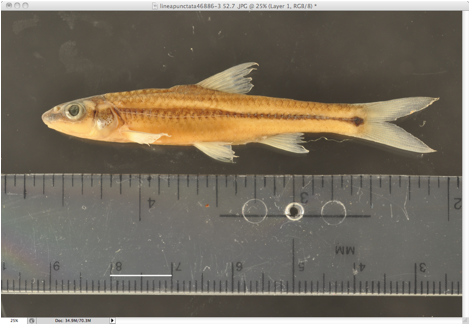
Fig. 2. Drawing Scale Bar.
Step 5: Crop. Crop the image so that only the specimen and the scale bar are visible.
Step 6: Magnetic Lasso. Choose the magnetic lasso (Fig. 3). Click somewhere along the edge of the specimen (like the snout tip), and then run the cursor over the edge of the specimen slowly. The lasso will adhere to the contour of the specimen, but probably not perfectly. It will be okay if the lasso misses a bit, you will fix this later.
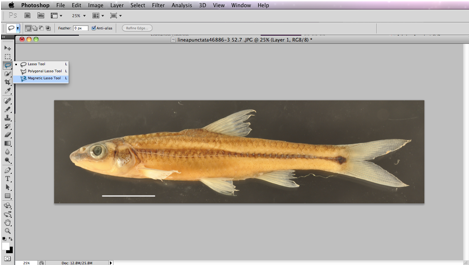
Fig. 3. The Magnetic Lasso Tool. Note that the tools in the toolbar menu have little arrows. If you click these, you will get options on similar tools.
Step 7: Inverse the selection. Choose Select>Inverse. What you really want to choose is the background and not the specimen. By inversing, you will now see the same flashing dotted line around the specimen, but will now also see it around the outside edge of the frame.
Step 8: Mask. On the bottom of the drawing toolbar is the mask button (just one on recent versions of Photoshop and two on older versions – one to mask [left] and one to unmask [right]). Click the button (left in old versions). Your specimen will now be pink to red, but there will be parts of the background that are red and parts of your specimen that are not (Fig. 4). What you want is the specimen and only the specimen to be red. For portions of the specimen that are not red, choose the pencil tool and an appropriate width for the section, and draw on the image. For portions of the background that are red, use the eraser tool and an appropriate width to erase them from the mask. Your results should be like in figure 5.
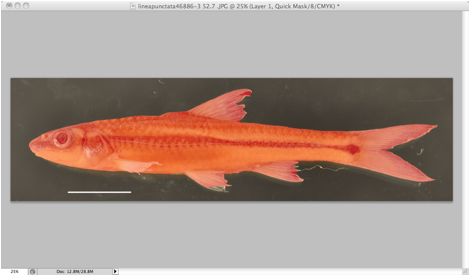
Fig. 4. Mask. Note that parts of the pelvic and anal fins are not covered by the mask and parts of the background (particularly in the hole in the dorsal fin are covered by the mask.
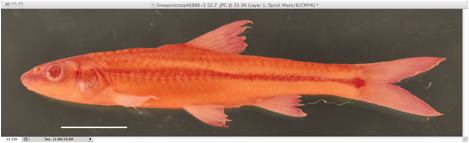
Fig. 5. Completed Mask. Note the fish and pretty much just the fish is covered by the mask.
Step 9: Select a new mask layer. Make sure that your copy of the Background Layer is highlighted in the Layer Window. Now click Layer>New Layer. You will see the new layer window, and you should click the box for “Use Previous Layer to Create Clipping Mask” (Fig. 6). Older versions of Photoshop include a similar command to keep the layer with the one previous. You now have a mask layer that you can now change to any color or pattern you want.
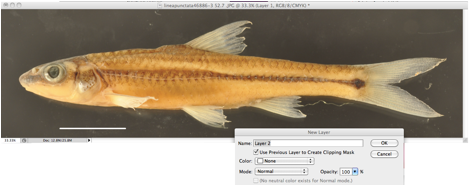
Fig. 6. Creating a mask layer.
Step 10: Fill mask. Select Edit>Fill and choose the color you want. Black and white are selections, but if you are choosing a different color, make sure that it is chosen as a background or foreground color. What you can do is to choose the background color from the background you shot the picture against by using the Eyedropper tool. This is generally preferable when shooting against a blue background because the background color will match what is coming through the translucent areas like fins. Once done, your background is homogenized (Fig. 7).
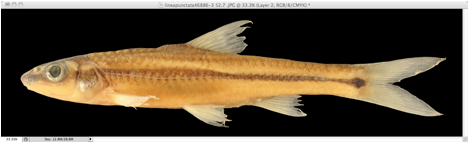
Fig. 7. First Homogenized Background.
Step 11: Clean-up. It is unlikely that you removed all of the background. In fishes, there are often holes in the fins that you might have missed. Make sure that your copy of the background layer is selected and choose the pen tool and fill in any areas where the background is showing through. You can also use the magic wand to select larger areas. The result is a perfectly homogenized background (Fig. 8).

Fig. 8. Final Homogenized Background
Step 12: Image Adjustments. In general, you want to minimally alter the image, but likely some adjustment is necessary. Sometimes, performing the Auto-fix features produces a nice image, and sometimes it makes it a little harsh. You can alter how much change is done by going to the Edit menu after you have performed an auto-fix and choosing Fade (after Fade, it sill say which auto-fix feature you had chosen last). In Adobe CS5, the auto-fix functions are under the Image menu as Auto Tone, Auto Contrast, and Auto Color. Luckenbill and Sabaj suggest going to Image>Adjustment>Levels. Once there, you will see a histogram with three small arrows, black, gray, and white (Fig. 9). The Black and white arrows should be at eth edge, but within the main body of the histogram. Then alter the gray arrow to achieve the look that you desire.
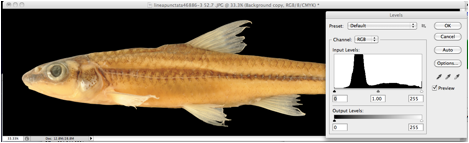
Fig. 9. Histogram showing color levels. All three arrows below the histogram should be within the main body of the curve.
The burn and dodge tools may also help where images are too light or too dark respectively. You can adjust whether you are working on midtones, highlights, or shadows and the exposure (how much change you are performing). The burn tool is especially useful when part of the image is overexposed or if you have light reflecting off of a wet specimen photographed in air, but be careful and set the exposure low (5-10%).
Finally, you can alter Sharpness under Filter>Sharpen>Unsharp Mask. This adjusts how sharp the pixels look (keep it near 50% and below 100%).
If, as I did, you covered over the scale bar layer, select it in the layer menu and choose Layer>Arrange>Bring to Front. The Image is now done (Fig. 10).
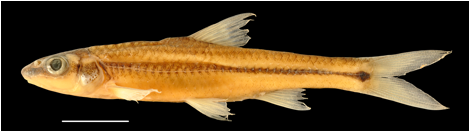
Fig. 10. Finished Product
Step 12: Metadata. Open File>File Info (Fig. 13). The required data is below the figure.
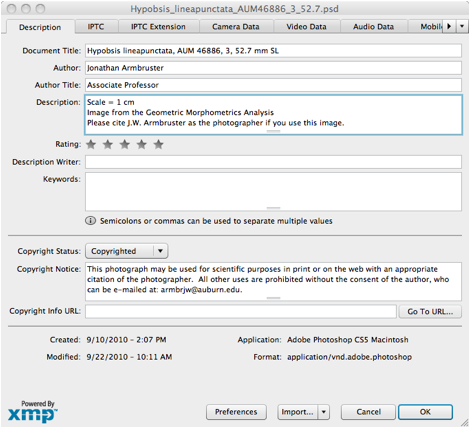
Fig. 11. Metadata.
Document Title: Give the name of the species, Catalog Number, Individual Number, Type Status (if any).
Author: Photographer’s name.
Description: Any additional information you wish to give. If you did not include on the image what the scale bar means, include it here. If you do not copyright the image, you may wish to include a statement such as “Please cite J.W. Armbruster as the photographer if you use this image.”
Copyright: Choose whether to copyright the photograph or have it in the public domain. All Cypriniformes will have an area to fill in copyright, but if you do copyright it, you should include the copyright symbol, the year, and your name on the photograph to ensure proper use. I have stated this photo as copyrighted for purpose of demonstration.
Copyright notice: How you wish the photograph to be used. We suggest that if you do copyright the picture state: “This photograph may be used for scientific purposes in print or on the web with an appropriate citation of the photographer. All other uses are prohibited without the consent of the author, who can be e-mailed at: YOUR EMAIL.”
Step 13: Saving the Image. We recommend you save the image as Genus_species_Catalog Number_Individual Number_Size: Hypobsis_lineapunctata_AUM46886_3_52.7. JPEG images loose resolution over time because they are compressed images. We recommend saving two files: a TIFF image with all layers and a TIFF image that has been flattened (all layers removed, Choose Layer>Flatten Image). You may also wish to save a JPEG as they are smaller, especially when imported into other programs.
Undoing what you have done. Photoshop allows for a minimal number of Undo’s, so if you get too far, you have to go back to the beginning. The History window shows what you have done, and you can go back to a step if you did something wrong, you just can’t go too far backwards. If your offending step is too far back, you will have to click on the original image in the History menu and start all over.
Please install Flash® and turn on Javascript.
If you encounter any security errors loading Monoslideshow, please update your security settings by adding the Monoslideshow folder to the trusted locations.